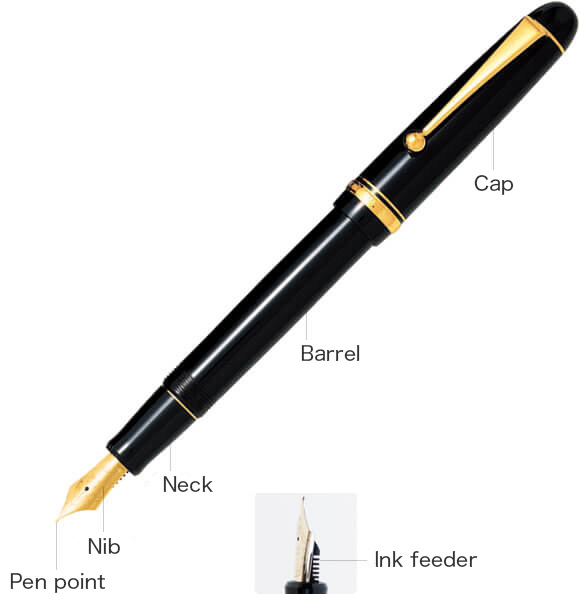
CUSTOM Production Process


1Alloy casting
Silver and copper are mixed with pure (24K) gold and melted at a high temperature of about 1,300 degrees Celsius to make alloys (18- and 14K gold). Skilled craftsmen judge the melting status and the moment of casting by the feeling in their hands transmitted through the mixing rod.

2Rolling
The block-shaped alloy is rolled thin and stretched into sheet. The rolling process is repeated about 100 times and, by means of advanced techniques, the alloy is made into a thin and slender sheet of metal while making its thickness uniform.

3Mountain-shaped rolling
After making slits in the sheet metal, it is rolled to stretch it even thinner, while leaving some thickness at the pen point side of the nib.

4Punching process
While determining the position of the angle-rolled sheet metal with the human eye, nib shapes are cast one by one. The thickness is measured by sequential sampling, and the dimensions are controlled with a margin of error of 0.01mm.

5Making of ball for pen point
Iridosmine fine powder, PILOT’s original mixed alloy powder, is instantly melted in plasma to make it spherical. The iridosmine ball thus manufactured is remade so that it forms a perfect sphere.

6Pen point welding
The iridosmine ball, which forms the pen point, is electrically welded to the die-cut nib. One by one, checks are made with a magnifying glass to ensure that the pen point has been welded exactly in the centre of the nib.

7 Engraving / Molding
After having set the engraving that is the nib’s trademark, the mold is made into the shape of a nib. Engraving and molding are done one by one by means of dedicated presses. At that time, engineers make subtle adjustments while feeling the sounds and sensing the vibrations of the pressing machine.

8Cutting process
Cuts are made in the centre of the nibs by means of a special, disk-shaped cutter. Without this cut (termed the slit), the ink inside the barrel would not pass down the nib. As it would affect the feel if the slit were to be off centre, after the cutting of the slit checks are made with the human eye through a magnifying glass.

9Narrowing the pen point and the slit / Inspection
So that the flow of ink is moderated, while checking one by one each slit opened by the cutting process with a magnifying glass, the slit adjustments are carried out using fingers. While inspecting them for scratches, adjustments are made so that the nib opens at a constant load.

10Nib assembly
Three parts are involved in assembly: the nib, the ink feeder, and the neck. If a misalignment or other defect occurs, it will affect the writing touch and the way the ink flows. While visually checking that the parts have been inserted perfectly, the ink controller is carefully inspected for any bending.

11Roughness inspection
This is the overall finishing process for nib manufacturing. In a room that shuts out the noise of the factory, specialists exercise keenly developed senses in polishing pen points thoroughly, using rubber whetstones and other tools. The inside of the pen point is also polished so that it is able to cope reliably with the Tome (stops) and Hane (upward brushstrokes or hooks) and other demands of Japanese handwriting.
After polishing, the nibs are tested one by one for the sounds they make from various angles and for the vibrations they send to the hand by means of ‘mock-writing’, writing without ink on paper specially made for writing inspections.

12Body assembly
The nib, neck, barrel, cap, and all other parts are assembled one by one to complete.
13Finished product
